Day 3 (final) Rick Jensen Carving Seminar
The final day has come and gone, and way too quickly I might add. Its been exhausting but in a great way. Meeting other carvers, seeing their work, sharing technique, experiences and talking about artists that are inspirations to each of us...just an awesome experience.
 I managed to put in a lot of detail today. Rick showed some interesting techniques and tools that made the experience more rewarding. The following picture shows the texture of the mushroom stem made a little more realistic to what a wild growing mushroom might look like simply by using an embossing tool to texture the bark.
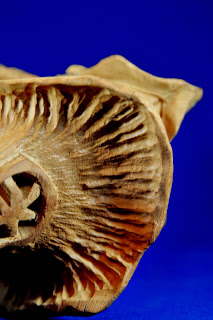
The following two photos show more texturing. The one on the left-hand side shows the underside of the mushroom top, simply textured with gouges/veiners OR with power which is how I chose to do it. The second picture shows a post, carved in place (not an added on piece of wood) and the texture of the bark, plus a knot. After seeing how Rick "antiques" the pieces, I can see this feature popping out once the finish is done (crosses fingers that I do this correctly).
Stay tuned for the final product which will include the finish, antiquing and a custom base that the carving is mounted on. Thanks for following!
 I managed to put in a lot of detail today. Rick showed some interesting techniques and tools that made the experience more rewarding. The following picture shows the texture of the mushroom stem made a little more realistic to what a wild growing mushroom might look like simply by using an embossing tool to texture the bark.
The following two photos show more texturing. The one on the left-hand side shows the underside of the mushroom top, simply textured with gouges/veiners OR with power which is how I chose to do it. The second picture shows a post, carved in place (not an added on piece of wood) and the texture of the bark, plus a knot. After seeing how Rick "antiques" the pieces, I can see this feature popping out once the finish is done (crosses fingers that I do this correctly).
And here are views of each side before the finish is applied, which I've started tonight but takes a while.
Stay tuned for the final product which will include the finish, antiquing and a custom base that the carving is mounted on. Thanks for following!


Comments
Post a Comment